Showing posts with label NJ Custom Furniture. Show all posts

Sunday, May 10, 2015

A Farmhouse Table and Bench, Part II

Here's Part II: The Table!

(With special thanks to Susie Sefcik Photography for the beautiful installation photos!)


The "Esther" Farm House table finally installed!

When we started collaborating on this table, my customer had some definite ideas about how she wanted the legs to look.  The hardest (and most rewarding) part of custom building is finding a way to bring someone's imagination to life.  In the end, there were probably a few dozen tweaks and variations on the design before we reached the final product, but it was great working with someone who could give direction and examples of what she wanted.  And in the end we created a set of table legs that I feel confident doesn't exist anywhere else in the world!

The other great thing - as a designer/builder - about collaboration, is that it forces you to explore styles and forms that are outside your normal parameters.  Nothing makes you a more complete craftsman than finding ways to build things that haven't been built before in a style you don't often pursue.  With the great response we've gotten already, I suspect these sweeping, interlocking legs are going to become big part of my repertoire in the future.

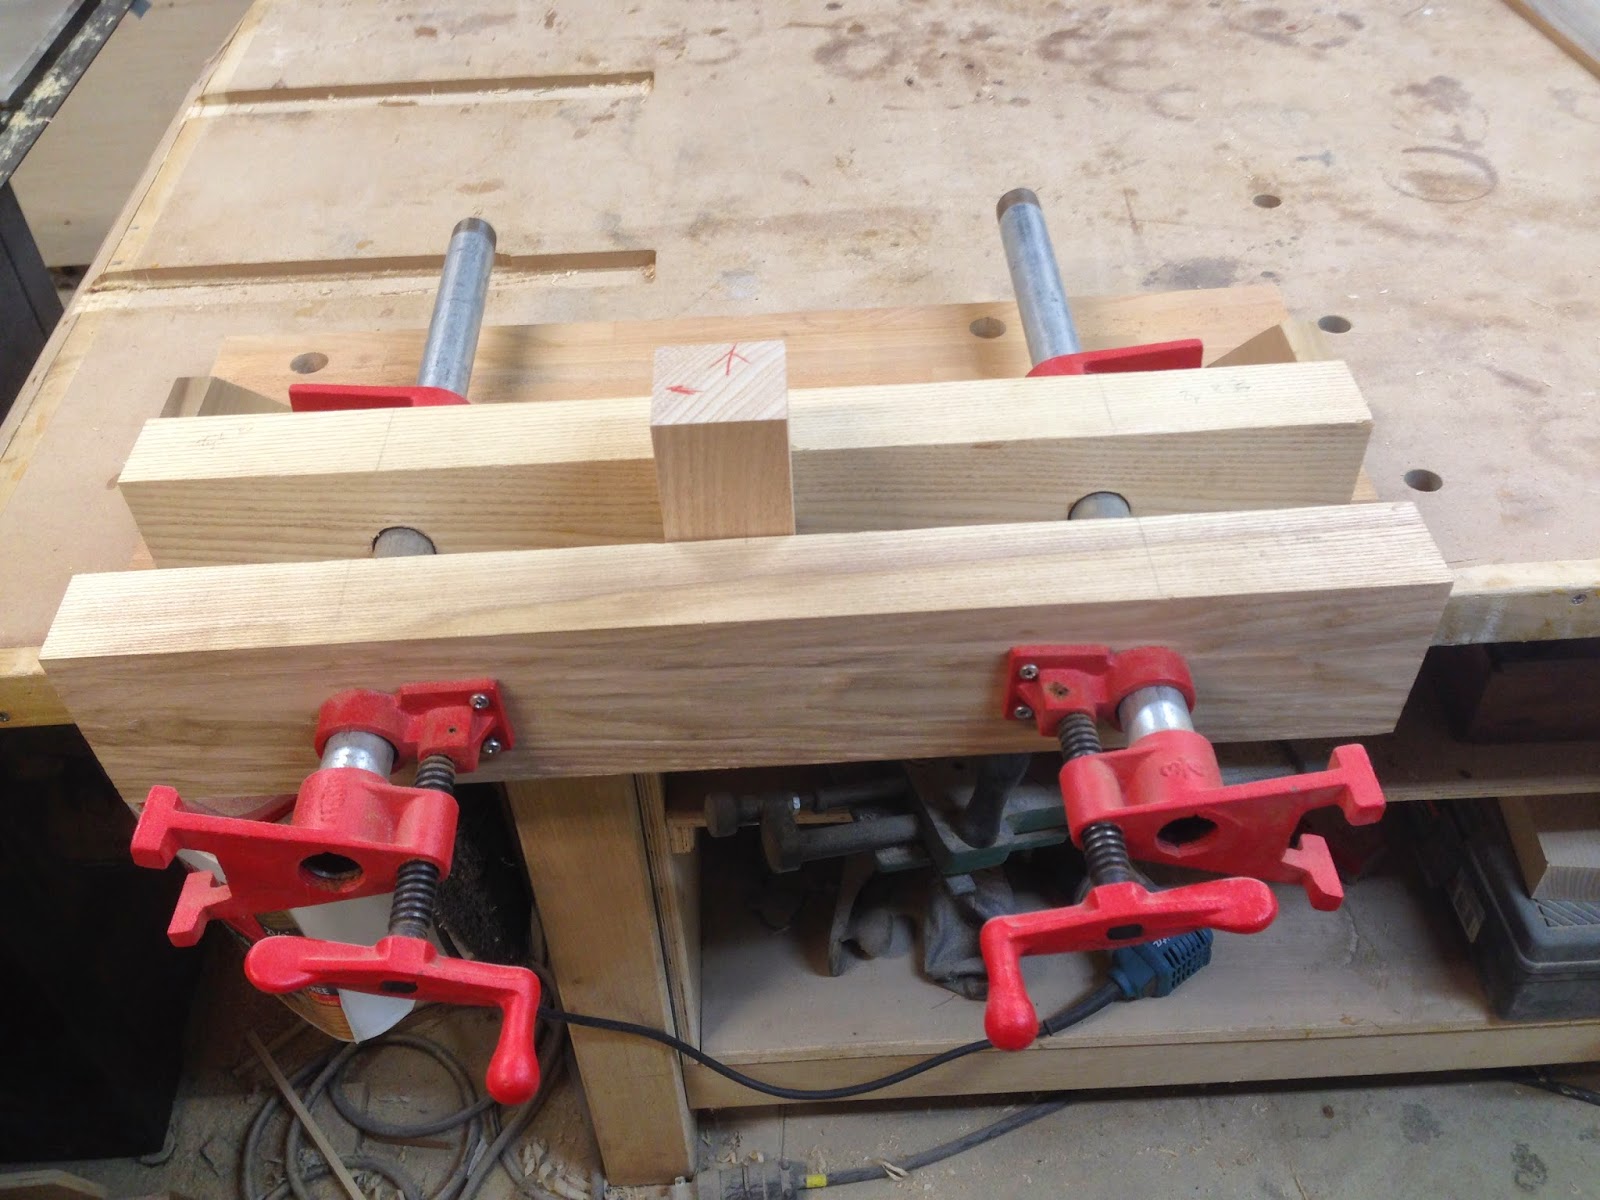
Rough fitting of the curved half-lapped joint.  It's not so easy to make!


Finding an appealing curve was only step one.  Next was incorporating a stretcher between the legs that is much lower than normal, keeping it closer to foot rest height than you might see on a typical trestle table.  This meant moving the intersection of the legs down and adjusting their final angle a few times until it was just right.

Test fit of the lower-than-normal stretcher.


I'm really happy with the way these ended up.  From a technical standpoint, cutting and routing out the half lap joint was definitely a challenge, but it also made for the very best combination of strength and aesthetic value.  I love that the legs look like they've almost grown together and I think it gives the table a very organic feel.


A good, tight half-lap joint should make the pieces look like they've grown together

Attaching the legs to the feet and table braces required a riff on thru-tenons.  Normally, thru-tenons are something I like to show off as part of exposed joinery, but for this table they are purely functional.  They provide a large amount of structure to join the legs to other sections of the base.  We could have gone with heavy lag screws alone and been fine, but - for us - "good enough" is never good enough.  I feel that it was definitely worth the effort to have wood structure passing through each piece to really lock them together.  The extra time it took to make these mortises and floating tenons gives me total confidence in these joints lasting a long time.

Two-sided mortises with "loose" tenons.  A solid, tight fit, reinforced with heavy lag screws.


The stretcher between legs is held in position with half-glued floating tenons and "Zip-Bolts" from Lee Valley.  These are almost completely hidden from view when installed and help pull the stretcher tight when in use, while still allowing the base the be quickly disassembled for moving or storage.


The table top itself is nearly four feet across and almost eight feet long, plenty of room for a big dinner (or very elaborate and heated game of Risk!)  Relative to the base, it's built fairly traditionally, crafted  from solid ash, with breadboard ends.  Each of these end caps is attached with "loose" tenons and half-glued dowels.  The boards themselves help keep the table flat, while the dowels allow the center of the table to expand and contract across the grain with changes in temperature and humidity.  It's always important to allow for wood movement (because it's going to happen whether you remember to plan for it or not!)

Those elongated holes in the tenons allow for the dowels to move with environmental changes.


The top and legs received the same "distressing" as the bench, though we went a little lighter on the legs and a little heavier on the table, hopefully anticipating the right proportion of wear that each can expect to receive in the future.  And while the top got a stain to match the bench, the legs got a beautiful deep brown wood dye ("Espresso" by General Finishes).  Each was then followed with the same hand-rubbed varnish and paste wax buffing.

"Moose" likes it, too!


In the end, it's hard to say goodbye to this piece.  It was really enjoyable to build and I'm hoping it will be even more enjoyable to use.  (And just be sure, myself, my father and Fern - the original "Shy Dog" - gave it a quick test ride!)  I hope its new owners have a great time making memories around this table for years and years.


Finally in it's new home!

A family table for a beach retreat!


Saturday, May 9, 2015

Farm Table and Storage Bench for a Beach House

It may seem obvious, but the real joy in having furniture custom made is getting exactly what you want, even if that thing has never existed in the world previously.  Actually...especially if that thing has never existed!

So when a customer came to us with an idea for a variation on the traditional "farmhouse table," we were excited to collaborate and bring her ideas into reality.   Even better was the opportunity to build the table as part of a set that would also include a long seating/storage bench.  And all made from ash, one of personal favorite species thanks to it's blonde color and the olive oil fragrance that fills the air when you mill it.  (Seriously.  That's how it smells when cut.  What a great wood for a table!)

Milling the rough ash.  Just made it on the bandsaw!  This might be the year for one with a slightly higher resaw height!


We started from a sketch and some online photo inspiration as we honed in on the basic structure of the table, then moved on to working out curvature and details of the legs.  It took quite a few drafts and 3D CAD renderings, but through our collaboration with the customer we got to something that worked structurally and aesthetically.  Plus, the design was in a vein we don't usually explore.  It's always exciting when the real seed of inspiration comes from the people who will ultimately enjoy our work.

Relative to the table, the bench was a little more straightforward design-wise.  It's an inch taller than standard chair height (19" vs 18") to accommodate younger members of the family and it features a ton of storage beneath a pair of hinged lids that are fitted with Sugatsune soft-close lid stays to keep fingers and heads safe.

So, here's how it all came together!

Like almost all of our projects, the wood was purchased rough, then milled and dimensioned in-house.  With a project like this, doing our own milling lets us do things like make a nearly 7/8" thick bench top instead of the standard 3/4" and make bench legs as heavy as the rough stock allows. We also opted to use ash veneered plywood from fantastic local supplier Boards and Beams for construction of the basic bench carcases.  This gives the core of the bench strength and stability, while still keeping everything perfectly matched species-wise. 

Solid ash legs and edges were fitted around the carcases, while panel trim was actually milled up from scratch to match some existing design ideas and enable us to use the same wood species for every single detail, even when ash molding isn't readily available from suppliers.

Fine tuning the fit of legs with a chisel, the bench carcase and in-house ash molding


Gluing up bench edges.  Remember: You can never have enough clamps!!


To keep everything flush and neat, the bench tops are left long and trimmed after being fit with hardware so that everything lines up nicely in the end.  Once everything was fit, the entire edge was routed in a single pass with a large roundover for seating comfort. 

Bench lid with Soft-Close lid stays and full-length piano hinge

In any home, the family table is going to form the center of a relaxed and comfortable gathering spot.  As such, we hope it sees many, many years of use.  In order to allow table and bench to age gracefully, the customer opted to have us "distress" the wood before delivery.  No easy task with a wood as strong and dense as ash!  But, we were happy to oblige and the pieces will now arrive looking "well-loved" upon installation.

A few of the distressing mark along the edge of the bench

With the table and bench destined to for a house on the shore, a whitewash look was the preferred finish choice.  Below are some variations on that theme that we prepared to aid in deciding the final color.  Finishes pictured below range from darker oil stains to white pigmented liming wax, with a few shades in between. We even offer a natural aging solution that gives open-pored wood like ash a "driftwood" look that results from a chemical reaction with an iron/vinegar solution we make ourselves.  (That one is second from the bottom right.  Isn't chemistry cool?!)

A variety of stains, vinegar solutions, waxes and topcoats 
After all distressing, the bench was finished with a white, oil-based stain and top coated with a several coats of rub-on satin varnish before receiving a final buffing with white-pigmented liming wax and standard furniture paste wax.  Here's to hoping it provides seating (and storage) for its family for years to come!


Check back soon for Part II: The Table!

Sunday, April 12, 2015

Doing a Jig

Sometimes, before you can make something, you have to make something else...

Despite what some visitors to the shop may think, I don't own every tool that one can own.  (Maybe in a dream.  A dream that also includes a 10,000 sq. ft. work space and nearly unlimited financial resources...)  However, the fact is, that even if I did own one (or two!) of everything,  I still wouldn't have everything needed to create every piece of furniture.  If necessity is the mother of invention, then jigs are definitely the kooky cousins next door.

So what is a "jig," exactly?  Put simply, a jig is usually a relatively specific creation, often shop built, that exists to either simplify or enable a specific woodworking task that isn't easily accomplished by tools in their "normal" state.  For example, a table saw excels at cutting a parallel edge in wood.  If you have one straight side, simply set the saw's fence to the desired width and you will soon have another straight side at the exact dimension required.

But how do you harness a table saw's fantastic ability to cut an exceptionally straight line and use that to make something like these tapered legs?

With a shop-made tapering jig!


This lets me hold a piece of wood at a set angle and push it through the saw cleanly, giving a nice, straight taper.  And I made mine adjustable as tapered legs are a very common attribute of fine furniture. 

But that's not the only jig I have made and use.  Not even close!


Above are some table saw dovetail jigs, a plane-blade mitering jig for decorative banding, and a spline cutting jig.


My shop-made dovetail marker, which is set to match - what else? - my shop-made dovetail jig!


Even a custom Moxon-style vise that I can use for up close joinery work and holding large pieces of wood that don't fit into a standard face vise.


The truth is, there are often more ways to build a piece of furniture than there are to skin a cat, but when something is being custom built for a specific location or purpose, there's not always an off-the-shelf solution.  Sometimes a jig is the only way to achieve and maximize the potential locked away inside a piece of wood.  Sure, they take extra time to make.  They're not very glamorous and - at times - they serve such a single and specific function that they actually become obsolete upon a project's completion. 

 (A good example of this would be the routing templates made to help form the details for these garage doors.  They've long since gone into the scrap bin, but they were invaluable for creating those repeatable lines.) 

Sure, a lot of times it would be faster to simply freehand a curved cut and avoid taking the time to make a template.  Or it might be far simpler to just run some screws into a biscuited joint and call it "good enough" as opposed to routing strong, permanent grooves into casework with dado jig like this one: 

But at Shy Dog, we strive to create custom furniture to last a lifetime.  "Good enough" is not the standard to which we adhere.  And if a project comes along that demands a new approach to construction, that's exactly what we create.  Jig and templates are worth the effort to create when they deliver a consistency and repeatability that could not otherwise be achieved.

Yes, at times it does feel like I'm just making stuff to make other stuff, but if - in the end - the "stuff" we make ends up being treasured furniture that lasts generations into the future, than those jigs were very worth effort indeed...

Wednesday, March 18, 2015

A Long Awaited Library

Gloria and Tom had always wanted a library added to the addition of their Interlaken home. Last year they finally got their wish!  Built-in book shelves sized large enough to handle their current collection...with room for more!
The scale of large built-ins can be challenging for a one man shop.  (It was this project that inspired me to finally replace my shop's overhead doors with swing-outs to reclaim some much needed overhead space!)  But to me, nothing looks better than floor to ceiling books.  I was excited to see these made reality.
After looking though several versions of designs mocked-up via 3D CAD, Gloria and Tom chose a receding and reducing form that draws the room and eye out towards their existing bay window.  At Shy Dog, things are very often designed from the floor up to suit the existing space.  The beauty of custom units is that they can be made to fit even the most challenging spaces.

The shelves, trim and crown moldings are all red oak, stained to match the couple's existing trim and finished with a satin water-based acrylic topcoat.  (One of my favorites.)  Every shelf is completely adjustable in two inch increments and still strong enough to support all of their books easily!  


Building anything into an existing spaces can be a challenge, but very often the rewards are worth the effort, especially when your favorite authors can live right next to your comfiest chair.


Hey, it looks like it's time for some new books!

Saturday, March 14, 2015

When you can't find an 11 foot sofa table...

Going with a piece of custom furniture means you aren't limited to what a store can provide.  Stock sizes are no longer an obstacle.  When Amanda and Michael needed a sofa table of unusual proportions, Shy Dog had the solution.

While no catalog has an 11 foot long table, that's only 15 inches deep, that's exactly what they needed to sneak in behind their extra long couch.  Taking a fairly standard design and stretching it to nearly twice the normal length, we created a double-length sofa table built to match the exact height of the back of their couch. 

Because it was a custom build, Amanda and Michael got to choose their style wood species and finish.  After seeing a few different versions mocked up in a 3D CAD program, they picked a Shaker-like leg design with true thru-tenons, done in walnut with an ebony stain under garnet shellac to give them a deep, rich color that would pair nicely with their existing hardwood floors.  The table is constructed with classic joinery that will allow movement and prevent cracking as the seasons and humidity change.  It can even be partially disassembled should the need arise.  (Because who wants to move and 11 foot table?!)

We hope Amanda, Michael and their family enjoy it for years to come!


Here are some of the custom samples I created for them to choose from...


True Thru-Tenons


And here is the final table. Before it left the shop on the left, and after install on the right...


Just in time to hold the buffet at the annual Superbowl party!